Summary
It's one friendly tool for Apple users, Apple users can use AirDrop to share and send photos/videos/apps/links to the iDevice nearby with AirDrop enabled. It's the free way to transfer data between iDevices. When AirDrop not working, check the issue by following the first part to solve the issue step by step from the second part. But if the AirDrop doesn't work on your iDevice, turn to the third part to find another way to transfer data between iPhone and iPhone/iPhone and iPad/iPhone and MAC.
2013, Apple released another useful tool for Apple users-AirDrop, which is the tool to share data files between iDevices for free. AirDrop is another great app for Apple users, no need for the paid app to transfer data between iDevice, you can share photos/videos/apps/links and other files on your iDevice to another iDevice by putting two or more iDevices nearby.
But AirDrop doesn't work on all iDevice, the old iOS version can't use AirDrop, you can update the iOS version to the latest one and then check if the AirDrop appears on the Share section.
When you got one video, how to share it with your boyfriend nearby? Use the AirDrop, select the video and share it with your boyfriend by tapping on the AirDrop icon. Your friend will get the video in a few minutes according to the size of the video.
- Part 1:Why is My AirDrop Not Working and How to Fix
- Part 2: How to Use AirDrop
- Part 3: What to Do When AirDrop Not Working And Can't Fix
Part 1:Why is My AirDrop Not Working and How to Fix
Since that AirDrop is the free method to transfer files between iDevices, it's annoying when AirDrop not working on your iDevice. So when you can t AirDrop files to others, find out the cause of the issue and solve the problem.
iOS Version
We've mentioned from the article above, not all iOS version and not all iDevice can run AirDrop, so first of all, if your iPhone/iPad/iPod/MAC is too old, check the iOS version from Settings>General>About>Version on your iDevice:
AirDrop Doesn't Work On:
MAC which was introduced in 2011 or earlier, and is using OS X Yosemite earlier.
Each iPhone, iPad, or iPod touch is using iOS 6 or earlier.
For the old iDevice, if you want to use AirDrop on it, update the iOS version to the latest one, then go to Photo APP to share one photo to the iDevice nearby, if the AirDrop icon appears, it means that your iDevice can use the AirDrop and the cause of the issue is the old iOS version.
Put two or More iDevice Nearby
AirDrop can only share files to the iDevice nearby, you should put all iDevice together within 3 meters, when the iDevice is far away, you can't scan out the iDevice you'll share the file to. Just put the iDevice nearby and to make sure that you can scan it out.
Bluetooth and WIFI
The AirDrop works with the help of WIFI and Bluetooth. Before using AirDrop to share files between iDevices, on the sender and receiver, turn on the Bluetooth and connect iDevice to the WIFI network and disable the mobile network connection.
AirDrop Settings
The AirDrop feature is available, the WIFI was linked and Bluetooth was turned on, at the same time, the iDevice you'll share the files to is nearby also. You can't scan out the iDevice name from the AirDrop list, maybe it's the problem of AirDrop settings.
Receiving off: Nobody can scan out your iDevice through AirDrop when you choose “Receiving Off” of the AirDrop settings.
Contacts Only: If you set AirDrop “Contacts Only”, when you want to share photos/videos/links/apps to another iDevice, you should add the email of Apple id to your contacts list, or you can't scan it out either.
Everyone: All iDevice nearby can scan out your iDevice and share files to your iDevice through AirDrop.
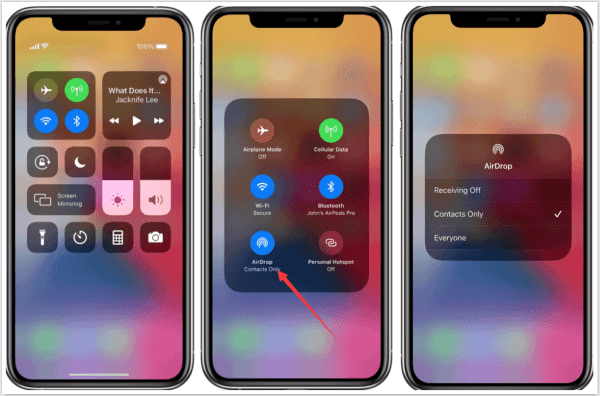
So when you want to get some photos/videos from iDevice through AirDrop, you can set up AirDrop to “Everyone”, when the process finishes, switch to “Receiving off” to avoid useless shares from others.
Part 2: How to Use AirDrop
It's the freeway to share files between iDevices, so why not get the skill to transfer data between iOS device? Follow the steps below to share files from one iDevice to another one.
How to Use AirDrop on iPhone/iPad/iPod
AirDrop sender or the receiver, first of all, connect to WIFI network, turn on Bluetooth, put the sender iOS device and the receiver iOS device together, don't forget to set the AirDrop settings to Everyone to receive files from the sender. When all is ready, follow the steps:
Go to the Photo app on iPhone/iPad/iPod, select one photo, tap on the Share button on the interface. Select the people or the device to share the selected data.
On the receiver device, when popping one window, tap on Accept button to save the photos to the Photo app also. But for iDevice with the same Apple id, no need to tap on Accept button to get the items from the sender, the items will be saved to the iDevice automatically.
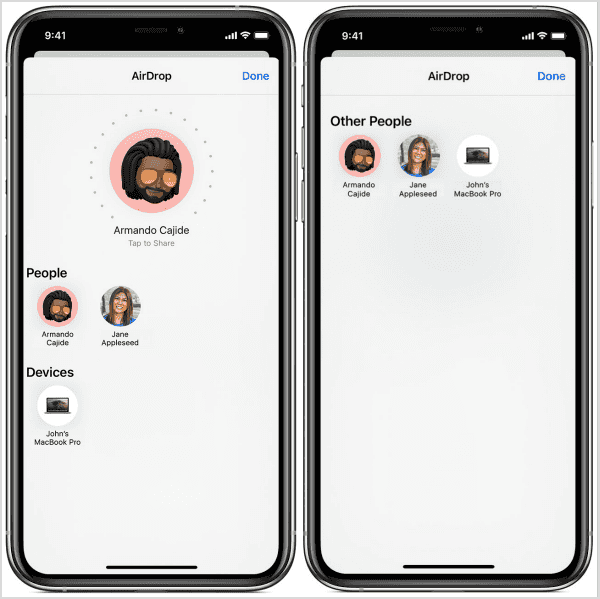
Not only photos but also videos, apps, links, almost all shareable items on iPhone/iPad/iPod when AirDrop icon appears on the share section.
How to Use MAC
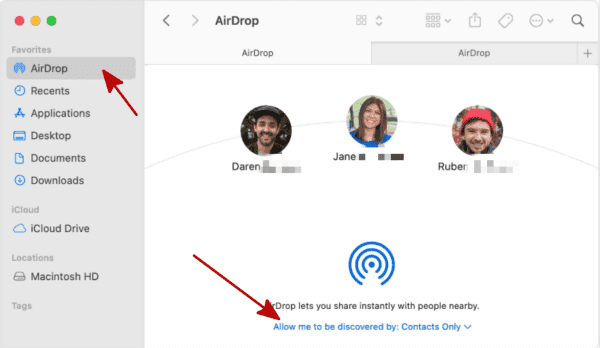
You should set up AirDrop settings on Finder>AirDrop>Allow me discovered by Everyone/Contacts only, so that the sender can scan out your MAC from the AirDrop list. Tap on Accept button to do the last step to save items from another iDevice.
When you share items on MAC, open the file you want to share, find out the Share button on the interface, tap on the people you want to share to.
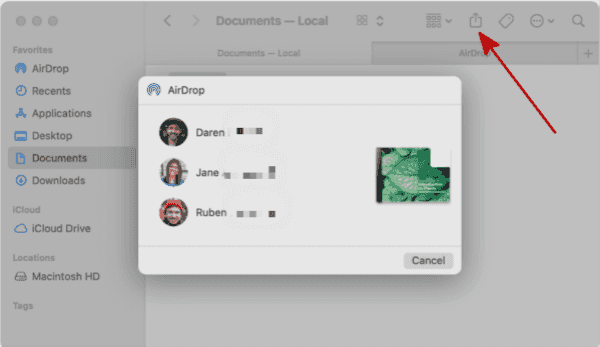
If you can't scan out iDevices nearby, go to the first part to have a check.
Part 3: What to Do When AirDrop Not Working And Can't Fix
The AirDrop is unavailable on your iDevice after all attempts, or you find that you can't share all files from one iDevice to another one at one time, it costs so much time to transfer data from iPhone to iPhone or backup iPhone data to MAC by using AirDrop, you can use the iDevice transfer tool to share data between iDevice with one click.
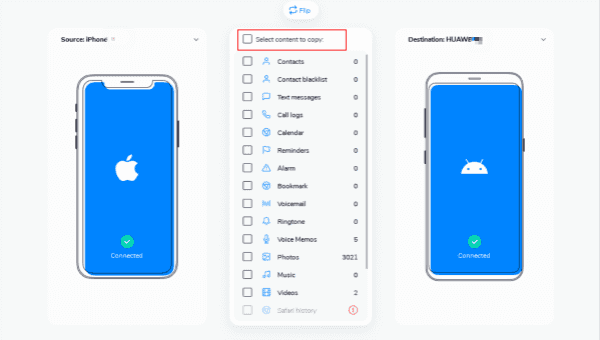
If you want to transfer data between iPhone and iPhone, or iPhone and iPad, you can use EelPhone Mobile Transfer, connect two iOS devices to computer at the same time, select the data type you want to transfer, tap on Transfer button to transfer data between iDevices with one click.
If you want to backup iPhone/iPad data to MAC, you can use EelPhone iPhone Transfer, once linked the iOS device to the computer, select the data type you want to backup from the home page of the software, click on Export to MAC to backup selected data to MAC.
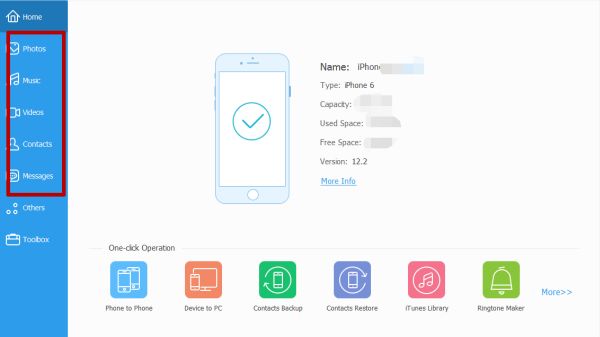
During the transfer or the backup process, just wait and keep connection, after a few seconds, all selected files will appear on another iOS device or MAC. It saves more time, and you can transfer more data types between iDevices by using the transfer tool than AirDrop, but it's paid tool rather than free. Use the right tool to share files between iOS device.
Alex Scott
This article was updated on 04 June, 2021

Likes
 Thank you for your feedback!


