Summary
How to sync photos from iPhone to Mac? download photos from iPhone to Mac to save more space on iPhone, and backup photos on iPhone to Mac, we can restore from Mac when lost photos on iPhone. iCloud is the free method to copy photos from iPhone to Mac with enough space on iCloud. Or when we want to get one quick method to move photos from iPhone to Mac, turn to EelPhone iPhone Transfer or EelPhone iPhone Data Recovery, download pictures from iPhone to Mac in clicks.
Backup is a good tool for iDevice, we always o backup iPhone photos iTunes/iCloud. We can restore from backup files if deleted iDevice photos by accident. But if we want to import pictures from iPhone to Mac, we have many ways to transfer photos from iPhone to Macbook. From all ways below, check the advantage of each method, find one best method to put photos from iPhone to Mac.
- Method 1: How to Get Pictures from iPhone to Mac via EelPhone iPhone Transfer-Quickest
- Method 2: How to Backup Photos from iPhone to Mac via Eelphone iOS Data Backup & Restore
- Method 3: How to Upload Pictures from iPhone to Mac via EelPhone iPhone Data Recovery
- Method 4: How to Get Photos Off iPhone to Mac via iCloud-Free
- Method 5: How to Save Photos from iPhone to Mac via Wechat-Free
Method 1: How to Get Pictures from iPhone to Mac via EelPhone iPhone Transfer-Quickest
Advantage of the first method to import pictures from iPhone to Mac is that we can manage iPhone photos on Mac at the same time, transfer photos from Mac to iPhone, and delete iPhone photos on Mac, create new album for iPhone. At the same time, manage other iPhone data on Mac as we like.
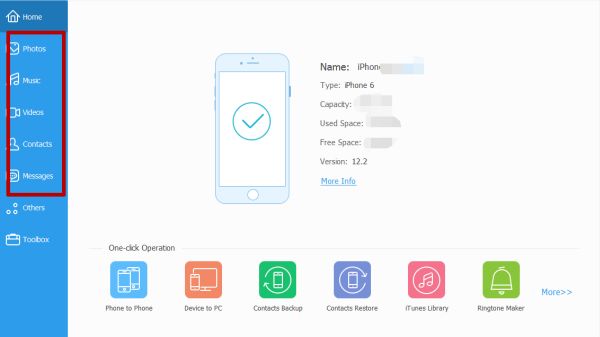
Step 1: Free download EelPhone iPhone Transfer on Mac, and launch the transfer tool after the installation. And then connect iPhone to Mac via USB cable.

Step 2: When iPhone connected to Mac, EelPhone iPhone Transfer will detect all photos on iPhone automatically when we click on Photos feather from the left side.
Step 3: Once all photos on iPhone were scanned out, select all photos or some photos from the scanning result, click on the Export icon from the top.
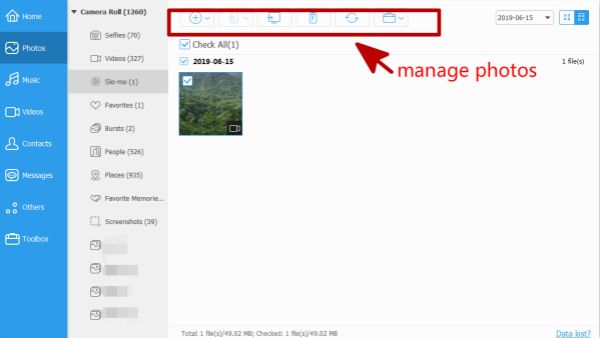
With 3 clicks, we can get photos from iPhone to Mac.
Method 2: How to Backup Photos from iPhone to Mac via Eelphone iOS Data Backup & Restore
Advantage of this method is that we can backup all photos to Mac, and then we can restore from Mac when deleted data on iPhone. Restore from the backup file directly.
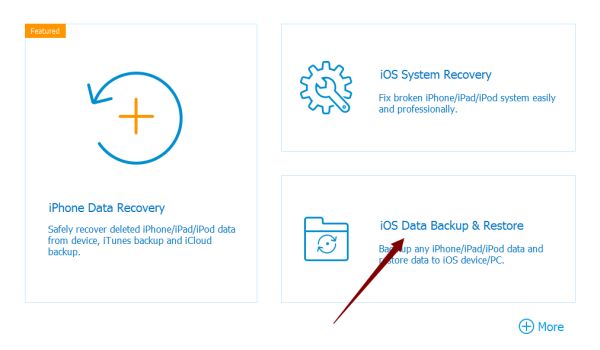
Step 1: Free download the EelPhone iOS Data Backup & Restore on Mac, launch it after the installation, then from all feathers on EelPhone, click on iOS Data Backup & Restore.
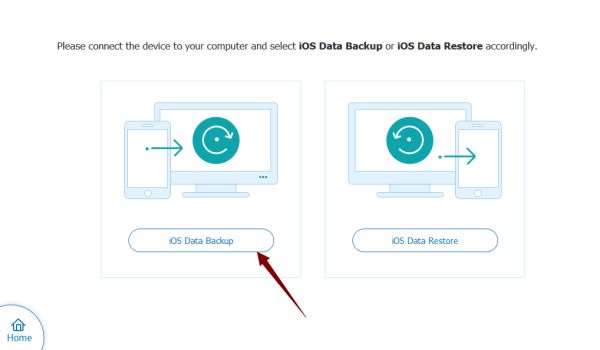
Step 2: Connect iPhone to Mac via USB cable. And click on ios data backup. Define one backup type, standard backup to download pictures from iPhone to Mac without password encryption, Encrypted Backup will get photos from iPhone to Mac with one password.
Step 3: From all data type, select Photo as the backup file, you can select all data to backup, then click on Next.
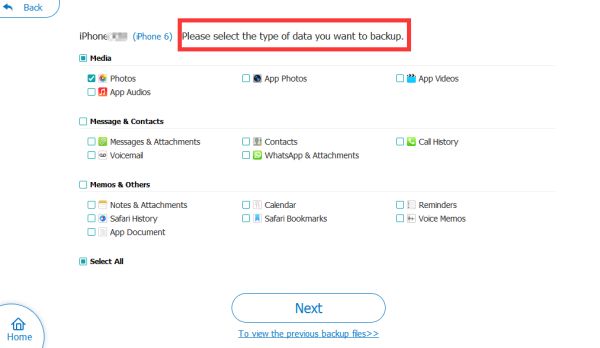
Ok, now, just wait, the EelPhone iOS Data Backup & Restore will move pictures from iPhone to Mac, it's one file in the folder that we should use the tool when we want to transfer photos from Mac to iPhone from backup next time.
Method 3: How to Upload Pictures from iPhone to Mac via EelPhone iPhone Data Recovery
Advantage of this method that we can even transfer deleted photos from iPhone to Mac. The scanning result including all photos on iPhone, so EelPhone iPhone Data Recovery will import photos from iPhone to Mac even lost photos on iPhone.
Step 1: Free download EelPhone iPhone Data Recovery on Mac, and launch it after the installation. From the main page of EelPhone, click on iPhone data recovery feather.
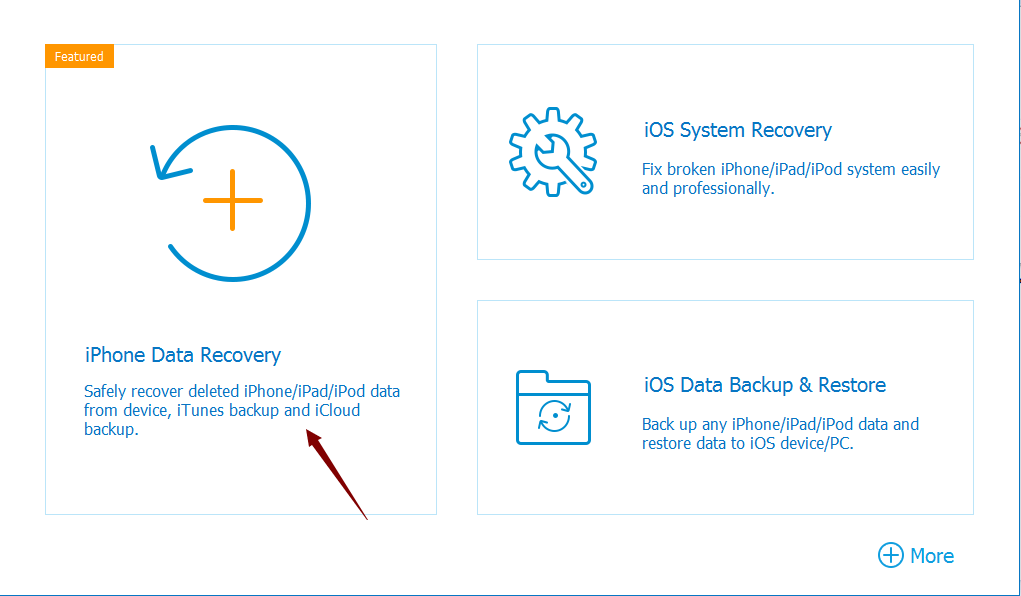
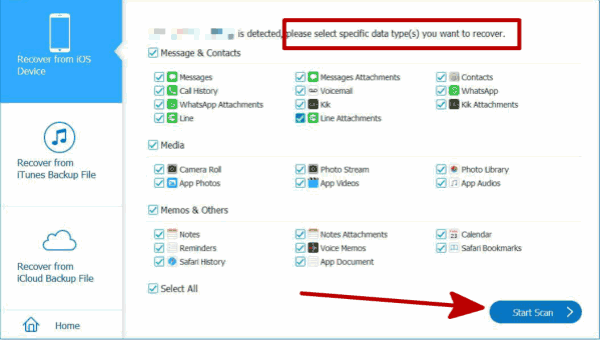
Step 2: Connect iPhone to computer, and once linked to the tool, appears all data type on iPhone, click on Photos feather to download photos from iPhone to Mac. Of course, we can even select another data type to backup to Mac. Then click on Start Scan button.
Step 3: The tool will extract out all photos on iPhone, including deleted photos. From the scanning result, all photos that can be moved to Mac can be previewed. Select photos from the scanning result, and then, click on Recover button to upload photos from iPhone to Mac.
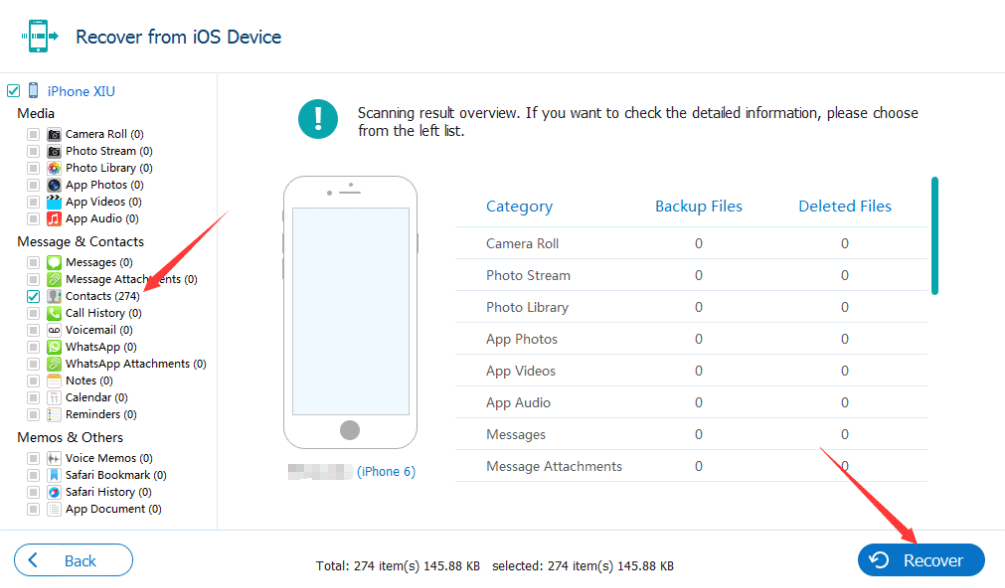
In 3 clicks, deleted iPhone photos are moved to Mac.
Method 4: How to Get Photos Off iPhone to Mac via iCloud-Free
It's the free method to sync photos from iPhone to Mac. But actually, it's not free, we already paid for iCloud, we back up all photos to iCloud, then we can upload photos from iPhone to Mac.
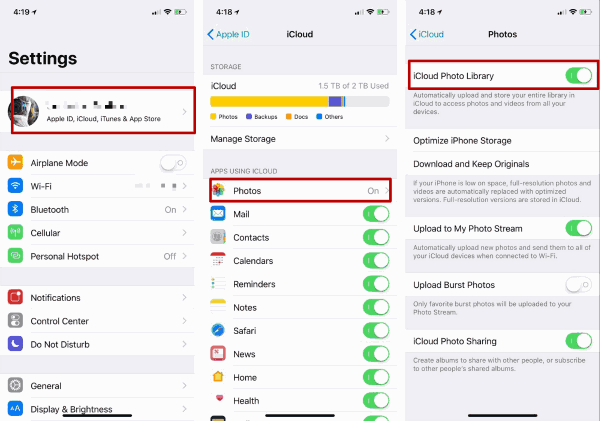
Step 1: First of all, we should backup all photos on iPhone to iCloud, go to Settings>[your name]>iCloud>Photos>iCloud Photos, enable iCloud Photos feather on iCloud, we should increase the iCloud storage to store all photos on iPhone.
Step 2: Sign in iCloud.com with the apple id and apple id password, then switch to iCloud photo, select the photos you want to download to Mac.

Define the save folder to download photos from iCloud to Mac, it's also easy to use iCloud to upload photos from iPhone to Mac.
Method 5: How to Save Photos from iPhone to Mac via Wechat-Free
WeChat, one chat app popular on china. It's one free chat app on china, we can download it from
https://www.Wechat.com/en/
Download it to Mac, and on iPhone APP store, download it also.
Register on Wechat account using the phone number, and we can sign in Wechat on iPhone and Mac at the same time, so after the installation of Wechat on iPhone and Mac, sign in with the same account.
On iPhone Wechat, send iPhone photos to Wechat File Transfer, on computer, on File Transfer, all photos are here, click one by one, and right-click to save it to Mac.

It's also one free method to download photos from iPhone to Mac, but it cost so much time if so many photos you want to save to Mac.
Alex Scott
This article was updated on 01 December, 2021

Likes
 Thank you for your feedback!


